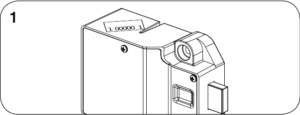
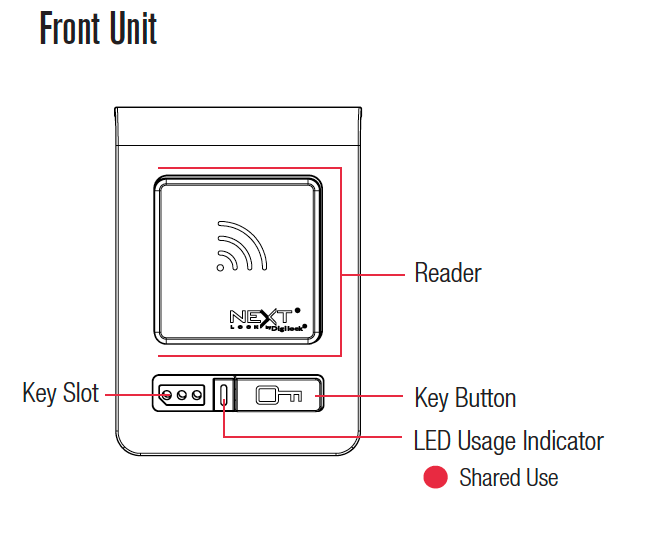
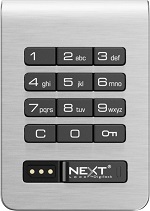
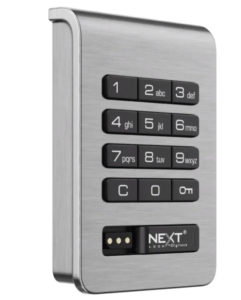
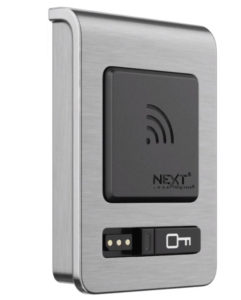
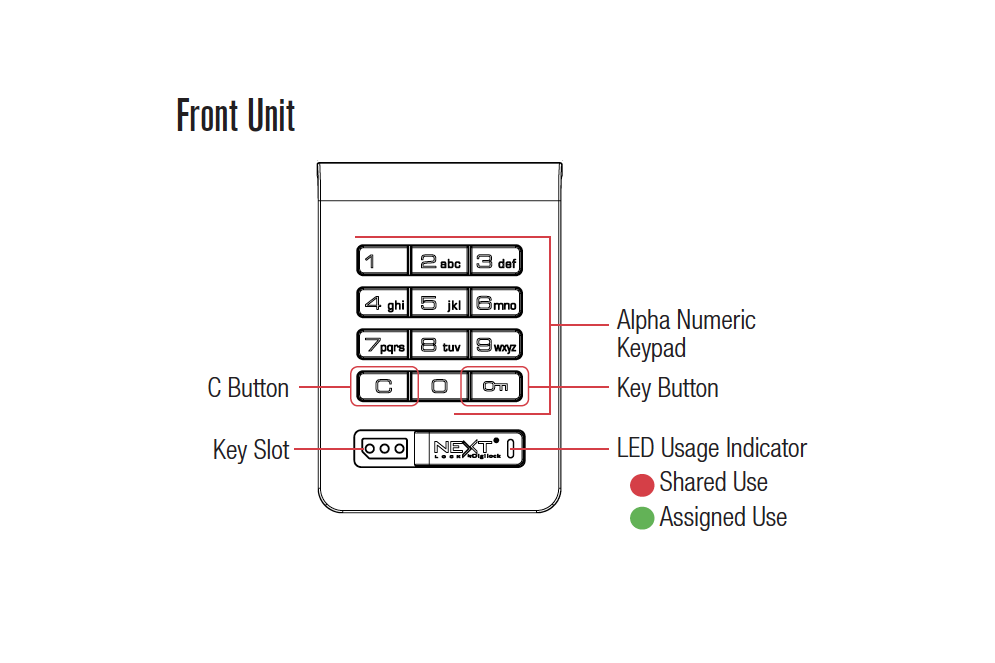
Cue locks operate with an alphanumeric keypad interface. Key managed locks also contain a key slot to operate locks with an ADA compliant User Key.
Power | 4 AA Batteries
Providing battery life of 124,500 cycles for Keypad & 75,000 cycles for RFID.*
*Based on average usage.
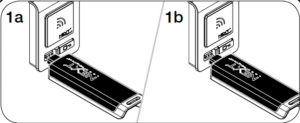
Body Style
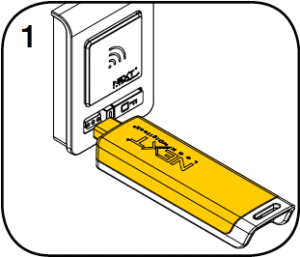
Front Unit
Finish | Brushed Nickel : Brass
Standard finishes of brushed nickel and brass. Custom finishes are available upon request.
Body | Standard
Available in standard body style with integrated pull handle.
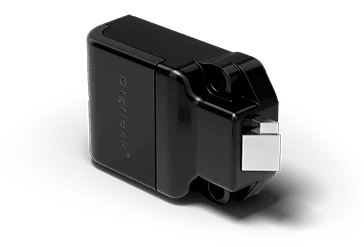
Deadlatch
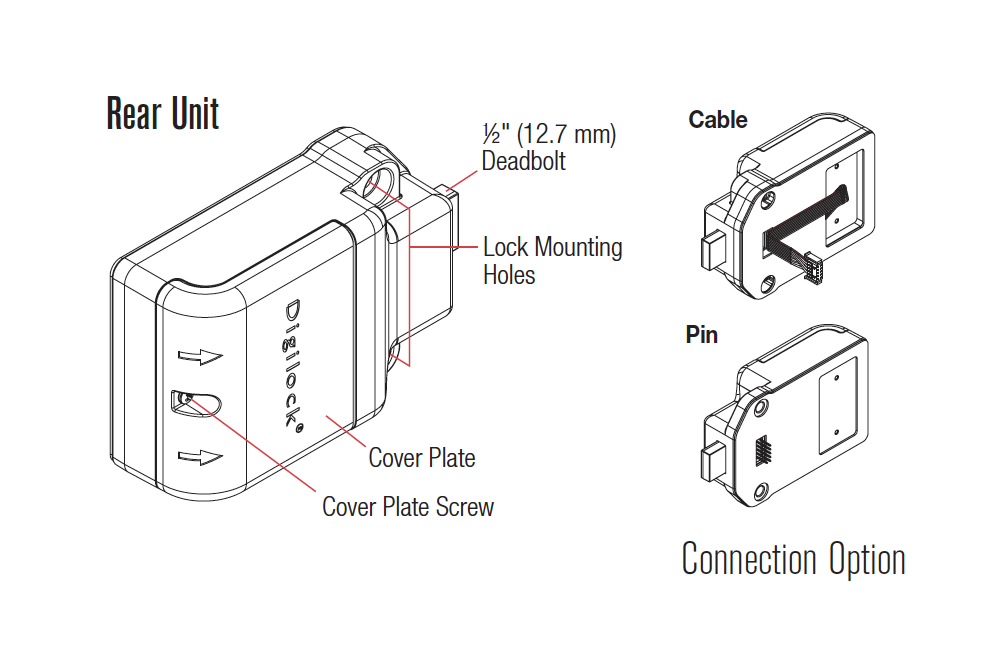
Rear Unit
Features a 1/2” (12.7mm) motorized deadlatch designed for assigned use functionality.
Assigned Use
In assigned use functionality, the locks are designed for lockers that are for private use. The user is assigned a locker and operates it with their assigned user credential.
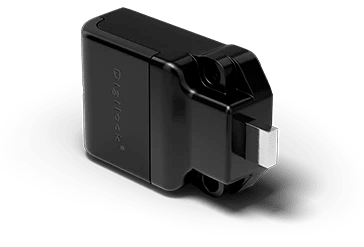
Deadbolt
Rear Unit
Features a 1/2” (12.7mm) motorized deadbolt designed for either shared or assigned use functionality.
Shared Use
In shared use functionality, the locks are designed for day-use lockers. The user chooses an available locker and operates it with a self-selected user credential. Once the locker is vacated, it becomes available for a different user.
Key Management
Patented electronic keys offer external power, audit, and override capabilities for a credible management system that significantly enhances productivity and reduces cost.
After three consecutive incorrect User Code entries to unlock, the lock will go into “Sleep Mode” for one minute and for an additional minute for each subsequent incorrect entry. The keypad is disabled while in “Sleep Mode”.
10 rapid beeps: The lock is binding which means that either door alignment or items in the locker are preventing the lock from operating. Press on the door while operating the lock. If error condition persists, contact support for assistance.
2 sets of three beeps: The batteries are low. Replace the batteries.
1 beep: The lock does not recognize the User Code, Manager Code, or Owner Code.
The lock does not recognize the User Code. For access, operate with the Manager Code. If in assigned use functionality, follow Assign User Code instructions to assign a new User Code to the lock.
The lock does not recognize the Manager Code. Follow instructions to Program a New 5-digit Manager Code by using the Owner Code. For access, operate with the Owner Code.
If in the unlocked position, follow the Battery Replacement instructions.
If locked press firmly on the locker door, if there is room to, lift up on the door, move it side to side in attempt to ajar it while operating the lock. If error condition persists, contact support for assistance.
After three consecutive incorrect User Code entries to unlock, the lock will go into “Sleep Mode” for one minute and for an additional minute for each subsequent incorrect entry. While in “Sleep Mode” the keypad is disabled and the LED flashes twice consecutively.
The lock is binding. This is often due to door misalignment, incorrect installation, or excess pressure on the rear unit.
If the lock is in the unlocked state, loosen the mounting hardware and attempt to operate the lock to test if the error condition persists. If the lock is still emitting the rapid beeping, uninstall the lock and test in hand.
If the lock is in the locked state and you cannot access the rear unit (i.e., the door is locked), press on the door while operating the lock. If the error condition still persists, contact Support for assistance.
If locked and the batteries are too low to operate, you will need to use your CUE power jumper to provide power to the lock, while the power jumper is plugged in, use your user code, or manager code to operate the lock, immediately change the batteries.
Ensure that the battery harness is properly connected to the circuit board and that you are using premium high-alkaline batteries. We recommend Duracell CopperTop or Energizer batteries.
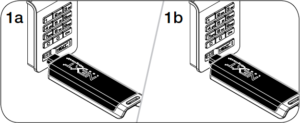
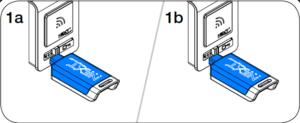
If the lock is still non-responsive after checking these two items, it may be a connection issue with the pins on the rear unit and the back of the front unit or an issue with the cable connection. To test, uninstall the lock and press or (RFID locks) several times while the front unit and rear unit are separated. Connect the front and rear units and test lock functionality before reinstalling the lock. If the error condition still persists, contact Support for assistance.
For best performance, we recommend premium high-alkaline Duracell CopperTop or Energizer batteries. Rear units with (3) screws on the battery cover take (2) 9V batteries. Rear Units with (4) screws on the battery cover take (4) AA batteries.
Follow the Reset Key instructions. After inserting the Reset Key into each lock, confirm that the lock has returned to factory default by pressing . The lock should now operate.
It is not necessary to uninstall the lock from the door.
CAUTION: Risk of explosion or leakage if battery is replaced by an incorrect type, mixed with a different battery type, or inserted backwards. Replace all batteries of a set at the same time. Be sure to insert batteries with correct polarities. Remove exhausted batteries from product promptly and dispose of used batteries according to the battery manufacturer’s instructions.
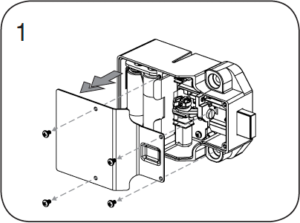
Remove the screws and the cover plate.
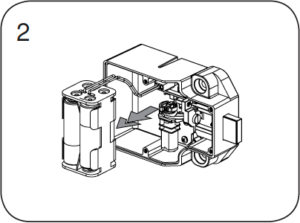
Pull the battery pack from the rear housing. Replace with four premium alkaline AA batteries. LED Place the battery pack back into the rear housing and screw
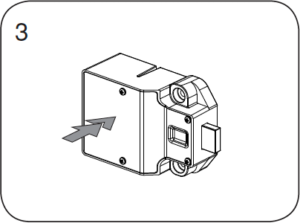
Place the battery pack back into the rear housing and screw cover plate in place.
The Programming Key can quickly program the same Manager Keys to operate multiple locks.
Go to the lock already programmed to operate with the Manager Keys. Press . The LED will turn on.
While the LED is on, insert the Programming Key. A two-tone beep will be heard and the LED will turn off.
At each lock to be programmed, insert the Programming Key. A two-tone beep will be heard and the LED will flash once to indicate successful programming.
To end Express Registration mode: Go to any programmed lock. Press then insert the Programming Key. Press then insert the Programming Key again to return the bolt to the original position.*
* The Programming Key will continue to function in Express Registration mode until it is used to operate a lock.
Manager Keys can be programmed to the locks at any time.
Go to a lock requiring additional Manager Keys. Press . The LED will turn on.
While the LED is on, insert the Programming Key. A two-tone beep will be heard.
Insert each additional Manager Key one at a time. A two-tone beep will be heard for each Manager Key programmed.
Insert the Programming Key. A two-tone beep will be heard and the LED will turn off. Repeat above steps for each lock or follow instructions to Express Register Manager Keys to program the same Manager Keys to multiple locks.
Replacement keys must be purchased and programmed to the locks to prevent the lost/stolen keys from operating a lock.
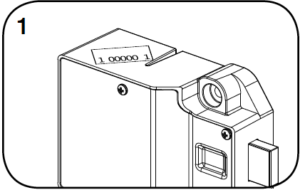
To replace the Programming Key: Note the order number (found on the lock’s rear unit).
Contact Support to purchase a replacement Programming Key.
To replace the Manager Keys: Collect all remaining Manager Keys. Go to any lock operated by the Manager Keys. Press . The LED will turn on.
While the LED is on, insert the Programming Key. A two-tone beep will be heard and the LED will remain on. Insert the Programming Key again. Three sets of two-tone beeps will be heard and the LED will turn off. All previously programmed Manager Keys are erased. Follow instructions to Add Manager Keys to program the intended Manager Keys to the locks.
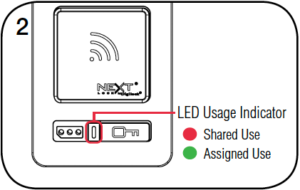
Each lock can be set for either shared or assigned use functionality. Press to check functionality. If in shared use, LED is red. If in assigned use, LED is green.
To set for assigned use: Press . The LED will turn on.
While the LED is on, insert the Programming Key. A two-tone beep will be heard and the LED will turn off.
To set for shared use: Press . The LED will turn on.
While the LED is on, insert the Programming Key. A two-tone beep will be heard and the LED will turn off.
Make sure that the lock is set for assigned use functionality. Once a user credential is assigned, the previously assigned user credential will no longer operate the lock.
Assign a User Code: Default User Code: Press then insert a valid Manager Key. The LED will turn on.
While the LED is on, press [new 4-digit code]. A two-tone beep will be heard. Press [the same 4-digit code]. Two sets of two-tone beeps will be heard and the LED will turn off.
Assign a User Key: Press then insert a valid Manager Key. The LED will turn on.
While the LED is on, insert a User Key. A two-tone beep will be heard and the LED will turn off.
When in shared use functionality, each lock can be programmed to have the LED fl ash or not fl ash while the lock is in use. The default setting is ON (red LED fl ashes while lock is in use).
To turn off the LED Usage Indicator: Press . The LED will flash.
While the LED is flashing, insert the Programming Key. A two-tone beep will be heard and the LED will turn off.
To turn on the LED Usage Indicator: Press . The LED will flash.
While the LED is flashing, insert the Programming Key. A two-tone beep will be heard and the LED will turn off.
When in shared use functionality, each lock can be programmed to auto unlock after a set number of hours. The default setting is OFF (does not auto unlock).
To turn on Auto Unlock: Press. The LED will flash. While the LED is flashing, insert the Programming Key. The LED will turn on.
While the LED is on, press the set number of hours from – then press . Two sets of two-tone beeps will be heard and the LED will turn off. For example: Press 8 to set the lock to auto unlock after 8 hours.
To turn off Auto Unlock: Press . The LED will flash.
While the LED is flashing, insert the Programming Key. A two-tone beep will be heard and the LED will turn off.
In assigned use functionality, users operate the lock with their assigned user credential (either a User Code or a User Key). To reassign a lock to a different user, follow instructions to Assign User Credentials.
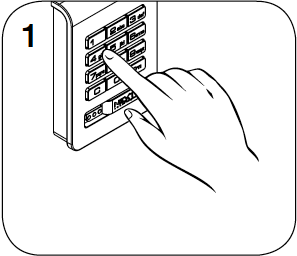
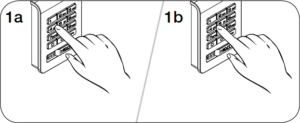
Operate with a User Code To lock: Close the door. Press [any 4-digit code]. To unlock: Press [the same 4-digit code].* Open the door.
Operate with a User Key To lock: Close the door. Insert any User Key. To unlock: Insert the same User Key. Open the door.
Operate with a Manager Key To unlock: Insert a valid Manager Key. Open the door. To relock: Close the door. Insert a valid Manager Key.**
In shared use functionality, users enter a self-selected 4-digit User Code or insert any User Key to lock and the same User Code or User Key to unlock. Once unlocked, the lock is available for a different user.
Operate with the User Code To unlock: Press [assigned 4-digit code]*. Open the door. To relock: Close the door. Press .
Operate with a User Key To unlock: Insert the assigned User Key. Open the door. To relock: Close the door. Insert the assigned User Key.
Operate with a Manager Key To unlock: Insert a valid Manager Key. Open the door. To relock: Close the door. Insert a valid Manager Key.
*After 3 consecutive incorrect User Code entries, the keypad will be disabled for 1 minute (Sleep Mode).
After three consecutive incorrect User Code entries to unlock, the lock will go into “Sleep Mode” for one minute and for an additional minute for each subsequent incorrect entry. The keypad is disabled while in “Sleep Mode”. A registered manager key may be used to override the lock in order to gain access when the lock is in sleep mode.
10 rapid beeps: The lock is binding which means that either door alignment or items in the locker are preventing the lock from operating. Press on the door while operating the lock. If error condition persists, contact support for assistance.
2 sets of three beeps: The batteries are low. Replace the batteries.
10 rapid beeps with 2 sets of 3 beeps The lock is binding with low batteries, the lock doesn’t have enough power to operate. If unlocked change the batteries and attempt to operate the lock again to see if the error indicator has cleared. If the lock is locked, use a registered manager key with a fresh battery to override the lock. Immediately change the batteries in the lock.
The lock does not recognize the User Code or User Key. For immediate access, operate with a valid Manager Key. Follow instructions to Assign User Credentials to assign a new User Code or User Key to the lock.
The lock does not recognize the Manager Key. Follow instructions to Add Manager Keys to program the Manager Key to the lock. For immediate access, operate with another valid Manager Key.
It is not necessary to uninstall the lock from the door.
CAUTION: Risk of explosion or leakage if battery is replaced by an incorrect type, mixed with a different battery type, or inserted backwards. Replace all batteries of a set at the same time. Be sure to insert batteries with correct polarities. Remove exhausted batteries from product promptly and dispose of used batteries according to the battery manufacturer’s instructions.
Remove the screws and the cover plate.
Pull the battery pack from the rear housing. Replace with four premium alkaline AA batteries. LED Place the battery pack back into the rear housing and screw
Place the battery pack back into the rear housing and screw cover plate in place.
When product ships from our warehouse, it is in factory default mode. This means it is has not been assigned a Programming or Manager Key.
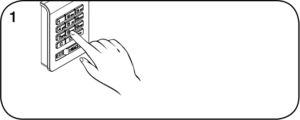
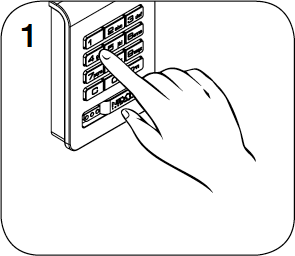
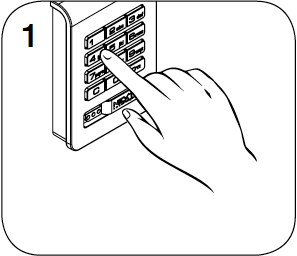
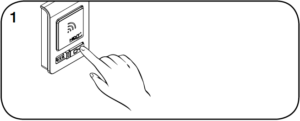
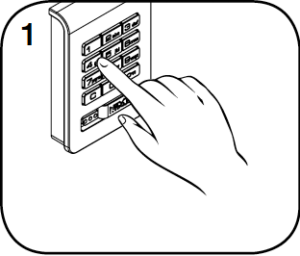
Keypad Locks will operate by pressing then .
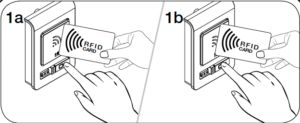
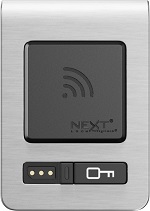
RFID Locks will operate by pressing .
Another indicator that a keypad lock is in factory default mode is if you can lock the lock with a 4-digit user code, and unlock with a different 4-digit user code.
When locks operate at the factory setting, they are not secure. Follow the Initial Setup instructions located in the product guide.
Locks with a green LED light have permanent usage functionality. This means a 4-digit user code needs to be assigned to the lock. Only the assigned code will operate the lock.
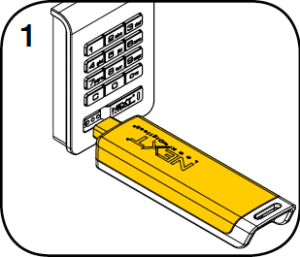
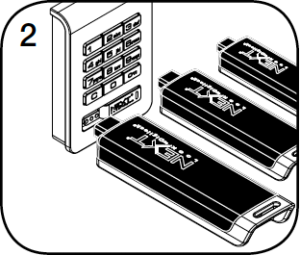
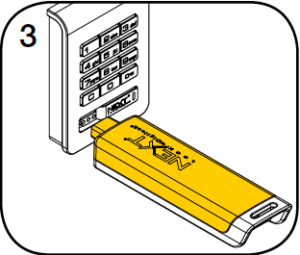
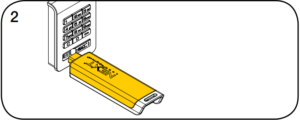
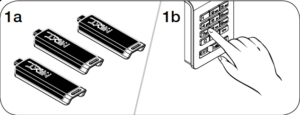
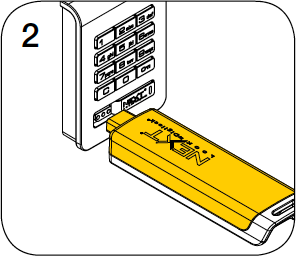
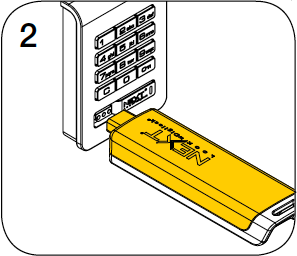
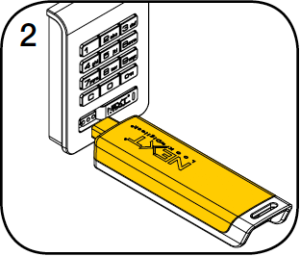
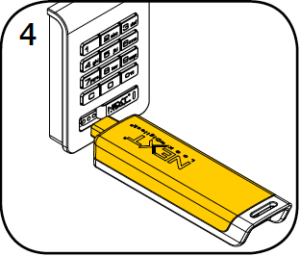
The Yellow Key is the Programming key. It’s main function is to assign Manager Keys and enable product features. When introduced to a lock in factory default mode, the Programming key will become registered to the lock, allowing the lock to function as ordered.
Follow the Setup instructions of your product guide to program your Programming Key.
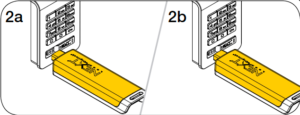
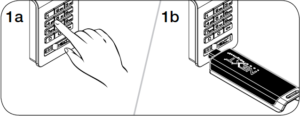
You must initialize the Programming Key to the locking system. Otherwise, the lock(s) will emit a single beep and LED flash when inserted into the key slot and the bolt will not move.
One Programming Key is allowed per locking system.
The Programming Key can also provide lock access. Refer to the Product Guide for instructions on how to use the programming key for lock access.
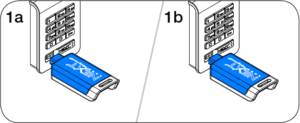
The Black Key is your Manager Key. This key provides override access, external power, and used to register user codes and ADA user keys.
You must program the Black Manager Keys to the locking system. Otherwise, the lock(s) will emit a single beep and LED flash when inserted into the key slot and the bolt will not move.
Each lock will program up to (25) Black Manager Keys.
The Yellow Programming Key is required to register Manager Key(s) to the locks. Refer to the Product Guide for instructions.
The Blue Key is the ADA User Key. This is an alternative user credential and keeps the locking system ADA compliant.
If your locks are Permanent usage functionality, you must program the Blue ADA User Keys to the locking system. Otherwise, the lock(s) will emit a single beep and LED flash when inserted into the key slot and the bolt will not move.
In the United States, ADA Regulations require a minimum of 5% of all lock openings to be ADA compliant. Nextlock Products offer many locks that are ADA compliant, meeting U.S. Federal ADA Standards for Accessible Design. To meet compliance guidelines, ADA lockers must utilize ADA compliant locks that do not require tight grasping, pinching or twisting of the wrist, or more than 5 lbs. of force to operate.
When the incorrect user code or RFID credential is used three consecutive times, the lock goes into sleep mode for 60 seconds. The lock will go into sleep mode for each subsequent failed attempt.
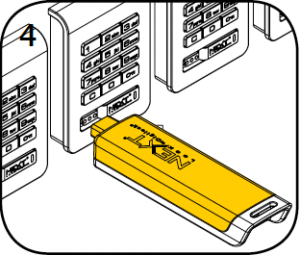
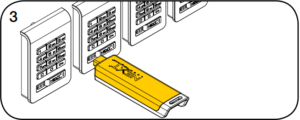
After you have followed the initial setup on one lock and tested the lock to ensure successful programming of all keys necessary, you will then follow the Express Registration instructions for all remaining locks.
Express Registration is only to quickly program Manager keys, additional lock features and user credentials must be added to each lock individually.
Contact support to purchase a new Programming Key.
You will need to provide Digilock with the sales order number or serial number located on the lock(s). Please confirm with Digilock the color of your current Programming key, as well as the brand of locks you will be programming if you do not have the sales order number or serial number.
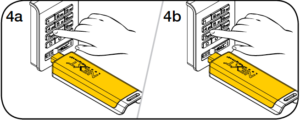
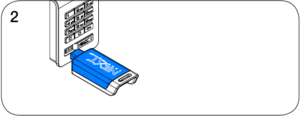
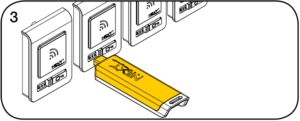
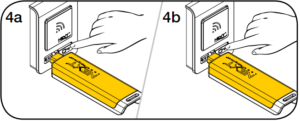
The batteries need to be changed in the lock(s). The Programming and Manager Keys are designed with a built in power jumper to power jump the locks when the battery power is too low.
The Programming and Manager keys are designed with a built in power jumper. You will use either key in the standard way to power jump and unlock the locker.
Immediately change the batteries with high alkaline, copper top batteries.
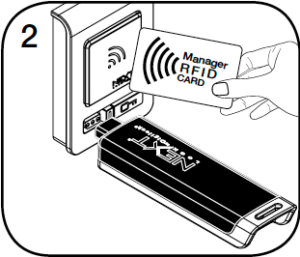
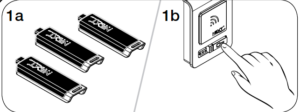
Locks are shipped with factory default settings (only operates by pressing ). Setup must be completed to program the Programming Key and Manager Keys or Manager RFID Credentials to all the locks.
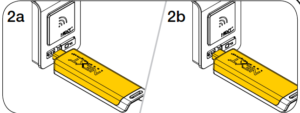
Insert the Programming Key. A two-tone beep will be heard and the LED will turn on.
While the LED is on, insert one Manager Key or present one Manager RFID Credential at a time. A two-tone beep will be heard for each Manager Key or Manager RFID Credential programmed.
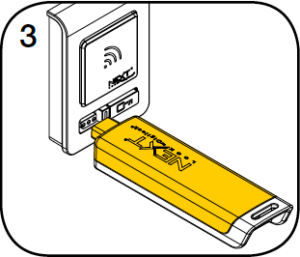
Insert the Programming Key. A two-tone beep will be heard and the LED will turn off.
Repeat above steps for each lock or follow instructions to Express Register Manager Credentials to set up all locks.
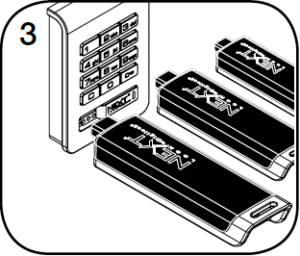
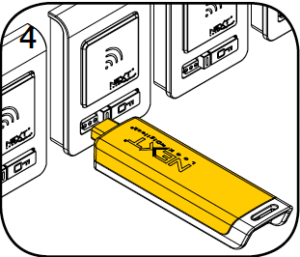
The Programming Key can quickly program the same Manager Keys and Manager RFID Credentials to operate multiple locks.
Go to the lock already programmed to operate with the Manager Keys and Manager RFID Credentials. Press and hold for 10 seconds (a two-tone beep will be heard after 5 seconds followed by 2 sets of two-tone beeps after 10 seconds) then release. The LED will turn on.
While the LED is on, insert the Programming Key Insert the Programming Key. A two-tone beep will be heard and the LED will turn off.
At each lock to be programmed, insert the Programming Key. A two-tone beep will be heard and the LED will fl ash once to indicate successful programming.
To end Express Registration mode: Go to any programmed lock. Press then insert the Programming Key. Press then insert the Programming Key again to return the bolt to the original position.*
* The Programming Key will continue to function in Express Registration mode until it is used to operate a lock.
Manager Keys can be programmed to the locks at any time.
Go to a lock requiring additional Manager Keys. Press and hold for 5 seconds (a two-tone beep will be heard after 5 seconds) then release. The LED will turn on.]
While the LED is on, insert the Programming Key. A two-tone beep will be heard.
Insert each additional Manager Key or Manager RFID Credential one at a time. A two-tone beep will be heard for each Manager Key or Manager RFID Credential programmed.
Insert the Programming Key. A two-tone beep will be heard and the LED will turn off. Repeat above steps for each lock or follow instructions to Express Register Manager Credentials to program the same Manager Keys to multiple locks.
Replacement keys must be purchased and programmed to the locks to prevent the lost/stolen keys from operating a lock.
To replace the Programming Key: Note the order number (found on the lock’s rear unit).
Contact Support to purchase a replacement Programming Key.
To replace the Manager Keys: Collect all remaining Manager Keys. Go to any lock operated by the lost/stolen manager credentials. Press and hold for 5 seconds (a two-tone beep will be heard after 5 seconds) then release. The LED will turn on.
While the LED is on, insert the Programming Key. A two-tone beep will be heard and the LED will remain on. Insert the Programming Key again. Three sets of two-tone beeps will be heard and the LED will turn off. All previously programmed Manager Keys and Manager RFID Credential are erased. Follow instructions to Add Manager Keys and RFID Credentials to program the intended Manager Keys to the locks.
In shared use functionality, the user presents a User RFID Credential or inserts any User Key to lock and the same User RFID Credential or User Key to unlock. Once unlocked, the lock is available for a different user.
Operate with a User RFID CredentialTo lock: Close the door. Press then present any User RFID Credential. To unlock: Press then present the same User RFID Credential. Open the door.
Operate with a User Key To lock: Close the door. Insert any User Key. To unlock: Insert the same User Key. Open the door.
Operate with a Manager Key To unlock: Insert a valid Manager Key. Open the door. To relock: Close the door. Insert a valid Manager Key.*
* If a valid Manager Key is used to relock, the previous user credential will continue to operate the lock.
10 rapid beeps: The lock is binding which means that either door alignment or items in the locker are preventing the lock from operating. Press on the door while operating the lock. If error condition persists, contact Digilock support for assistance.
2 sets of three beeps: The batteries are low. Replace the batteries.
The lock does not recognize the Manager Key. Follow instructions to Add Manager Keys and RFID Credentials to program the Manager Key to the lock. For immediate access, operate with another valid Manager Key.
The lock does not recognize the Programming Key. If the Programming Key has been replaced, operate with the Replacement Programming Key. Contact support for additional assistance.
It is not necessary to uninstall the lock from the door.
CAUTION: Risk of explosion or leakage if battery is replaced by an incorrect type, mixed with a different battery type, or inserted backwards. Replace all batteries of a set at the same time. Be sure to insert batteries with correct polarities. Remove exhausted batteries from product promptly and dispose of used batteries according to the battery manufacturer’s instructions.
Remove the screws and the cover plate.
Pull the battery pack from the rear housing. Replace with four premium alkaline AA batteries. LED Place the battery pack back into the rear housing and screw
Place the battery pack back into the rear housing and screw cover plate in place.
When product ships from our warehouse, it is in factory default mode. This means it is has not been assigned a Programming or Manager Key.
Keypad Locks will operate by pressing then . RFID Locks will operate by pressing .
Another indicator that a keypad lock is in factory default mode is if you can lock the lock with a 4-digit user code, and unlock with a different 4-digit user code.
When locks operate at the factory setting, they are not secure. Follow the Initial Setup instructions located in the product guide.
Locks with a green LED light have permanent usage functionality. This means a 4-digit user code needs to be assigned to the lock. Only the assigned code will operate the lock.
The Yellow Key is the Programming key. It’s main function is to assign Manager Keys and enable product features. When introduced to a lock in factory default mode, the Programming key will become registered to the lock, allowing the lock to function as ordered.
Follow the Setup instructions of your product guide to program your Programming Key.
You must initialize the Programming Key to the locking system. Otherwise, the lock(s) will emit a single beep and LED flash when inserted into the key slot and the bolt will not move.
One Programming Key is allowed per locking system.
The Programming Key can also provide lock access. Refer to the Product Guide for instructions on how to use the programming key for lock access.
The Black Key is your Manager Key. This key provides override access, external power, and used to register user codes and ADA user keys.
You must program the Black Manager Keys to the locking system. Otherwise, the lock(s) will emit a single beep and LED flash when inserted into the key slot and the bolt will not move.
Each lock will program up to (25) Black Manager Keys.
The Yellow Programming Key is required to register Manager Key(s) to the locks. Refer to the Product Guide for instructions.
The Blue Key is the ADA User Key. This is an alternative user credential and keeps the locking system ADA compliant.
If your locks are Permanent usage functionality, you must program the Blue ADA User Keys to the locking system. Otherwise, the lock(s) will emit a single beep and LED flash when inserted into the key slot and the bolt will not move.
In the United States, ADA Regulations require a minimum of 5% of all lock openings to be ADA compliant. Nextlock Products offer many locks that are ADA compliant, meeting U.S. Federal ADA Standards for Accessible Design. To meet compliance guidelines, ADA lockers must utilize ADA compliant locks that do not require tight grasping, pinching or twisting of the wrist, or more than 5 lbs. of force to operate.
When the incorrect user code or RFID credential is used three consecutive times, the lock goes into sleep mode for 60 seconds. The lock will go into sleep mode for each subsequent failed attempt.
After you have followed the initial setup on one lock and tested the lock to ensure successful programming of all keys necessary, you will then follow the Express Registration instructions for all remaining locks.
Express Registration is only to quickly program Manager keys, additional lock features and user credentials must be added to each lock individually.
Contact support to purchase a new Programming Key.
You will need to provide Digilock with the sales order number or serial number located on the lock(s). Please confirm with Digilock the color of your current Programming key, as well as the brand of locks you will be programming if you do not have the sales order number or serial number.
The batteries need to be changed in the lock(s). The Programming and Manager Keys are designed with a built in power jumper to power jump the locks when the battery power is too low.
The Programming and Manager keys are designed with a built in power jumper. You will use either key in the standard way to power jump and unlock the locker.
Immediately change the batteries with high alkaline, copper top batteries.


 or
or  (RFID locks) several times while the front unit and rear unit are separated. Connect the front and rear units and test lock functionality before reinstalling the lock. If the error condition still persists, contact Support for assistance.